F internet shearing

Tuesday, 28 April 2015

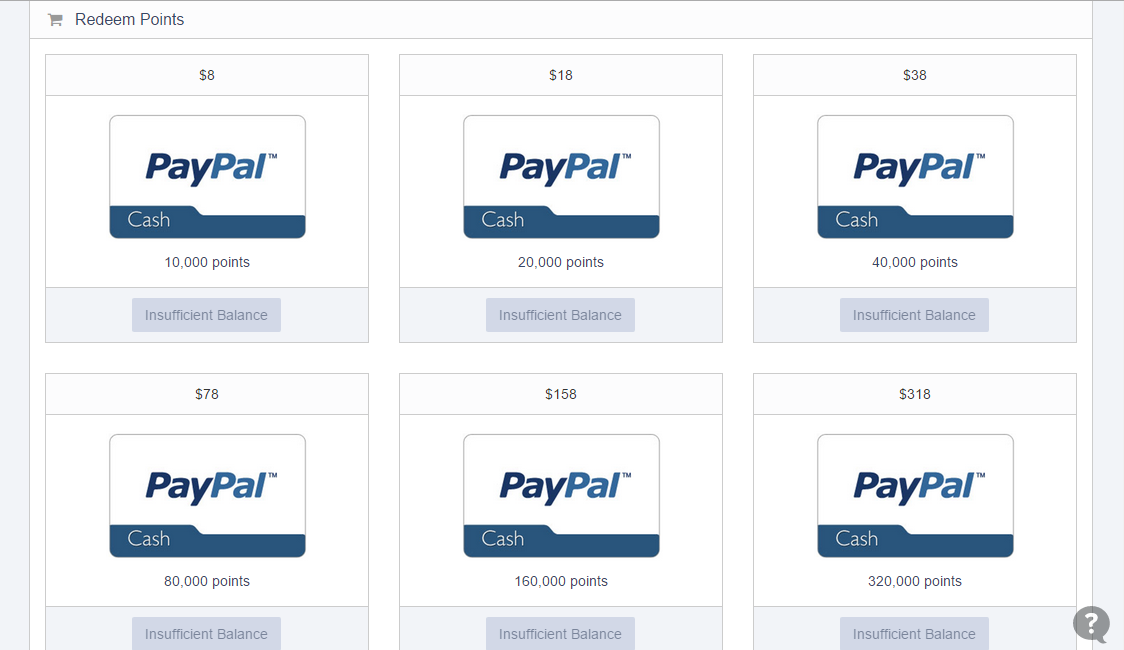
register yroo dapat 8$

- Register disini
- Verifi email
- Buka Treasure
kalo hoki dpt 100.000 point
10.000 point = $8
wd via paypal
http://i.imgur.com/IpTnAol.png

http://postimg.org/image/vs2ubcttj/


Dapatkan poin referral
Untuk waktu yang terbatas, Anda dapat mengundang teman-teman Anda melalui jejaring sosial atau email dan mendapatkan 1.000 satu kali bonus poin Diklaim ditambah peti harta karun senilai 100.000 poin untuk setiap teman yang bergabung dan 10.000 poin ketika mereka melakukan pembelian pertama mereka. Plus, mendapatkan 3,0% dari imbalan belanja mereka pada setiap pembelian yang mereka buat!

mendapatkan komisi
Sekarang Anda bisa mendapatkan uang dari yroo jendela berbelanja dengan teman-teman Anda.

Hanya pergi ke halaman katalog atau kupon halaman kami dan membuat daftar keinginan untuk berbagi dengan teman-teman Anda. Anda mendapatkan uang tunai kembali untuk hal-hal yang Anda beli dan hal teman-teman Anda membeli!

Untuk waktu yang terbatas, Anda juga akan menerima 10.000 satu kali bonus poin Tidak Diklaim ketika Anda menerima uang pertama Anda kembali atau komisi penjualan.

Sunday, 12 April 2015

PayCoin and Josh Garza Crash Down

Over the last few months, Coin Fire’s reporting has produced multiple stories featuring Mr. Homero Joshua Garza, CEO of GAW Miners, LLC, regarding the cryptocurrency PayCoin (XPY) that he helped to create.  These stories have documented failures and deception perpetrated by Mr. Garza with respect to his PayCoin product.
This morning, the PayCoin Foundation issued a bold, “Declaration of Paycoin’s Independence.” The document stated that the organization wished for PayCoin to shed some of the previous baggage and move forward in a statement published on the PayCoin Foundation website.
The fate of Paycoin is now in the hands of every person and organization that hold coins.  With this new found freedom, we want to exercise our rights to make Paycoin the people’s money and do what is necessary to help the coin thrive.
The PayCoin Foundation is led by President Adam Matlack. Mr. Matlack recently found himself in the center of an investigation by several United States Government agencies looking into the alleged wrong-doings of Mr. Garza. Mr. Matlack is the owner of at least three PayCoin Prime Controllers.  He also manages an organization that controls several Prime Controllers.
Mr. Garza initially communicated internally via email that Mr. Matlack controlled 15 Prime Controllers with the remaining controllers falling under GAW and Mr. Garza’s control. These emails were obtained by a Federal Search and Seizure warrant and recently obtained by Coin Fire’s editorial team. Mr. Garza later denied that he turned over information regarding the ownership of Prime Controllers, in direct contempt of the SEC subpoena.
A document issued by the PayCoin Foundation entitled “Paycoin Prime Node Operational Agreement” broke down a potential solution to the image problem that PayCoin is currently experiencing as a result of hyper-inflation and Prime Controller distribution.
The PayCoin Foundation shared it was happy to be working toward a new era for PayCoin, stating,
The  Paycoin Foundation supports these proposals and is pleased to join other entities in creating a better future for the coin and those who support it and want to use it.
Mr. Garza appeared unaware of the Foundation’s moves, stating on HashTalk this morning:
Screenshot 2015-04-09 15.00.09
Mr. Garza Response to PayCoin Foundation
The statement shook the crypto markets as members of HashTalk expressed intense concern that the currency would come crashing down. Within minutes of Mr. Garza’s statement on HashTalk, the site was inundated with inquiries from worried investors. The price of PayCoin began crashing across various exchanges.
Concerned HashTalk Posts
Screenshot 2015-04-09 12.54.01
The proposal from the PayCoin Foundation suggested that the the PayCoin Foundation would agree to reduce the hyperinflation of the coin if at least 51% of the PayCoin Prime Controller owners voted in the affirmative. They also agreed that no one person or organization would own more than 50% of the nodes and that all parties would agree to the new terms.
The nodes are currently controlled by The PayCoin Foundation, Inc., Paycoin Core Development Corp., XPY Trust, Adam Matlack, GAW, and an unknown number of other investors. Each owner would receive one vote for each controller he or she currently owns and controls.
According to emails, text messages, and other electronic messages obtained via government warrants, the remainder of the controllers are currently under the majority control of Mr. Garza. Mr. Garza controls these controllers for himself personally or for entities who wish to avoid KYC/AML regulations.
Mr. Garza intended to claim to the SEC that only Mr. Matlack owned Prime Controllers and that the remainder were under GAW control. On paper, Mr. Garza and Mr. Matlack were the only investors who had paid for the controllers as many were given away under agreements with several organizations that Mr. Garza had a vested interest in. Those organizations include Mineral and CoinStand along with many more that were “controlled” by Mr. Garza and his brother Carlos, but paid for by individuals off the books to avoid certain KYC/AML issues.
Internal Emails Show Mr. Garza intended to lie to SEC
Internal Emails Show Mr. Garza intended to lie to SEC regarding Prime Controller ownership
Mr. Garza began crying foul that the Foundation was in violation of previous agreements.  He stated that he could publicly produce documentation supporting his claim and that a PayCoin without GAW’s guiding hand would not happen.
Mr. Garza asserts PayCoin without GAW's wishes will not happen
Mr. Garza asserts PayCoin without GAW’s wishes will not happen
Mr. Garza’s sudden about-face came as a shock to many in the community who felt that the PayCoin Foundation should be allowed to continue work on the coin without interference from Mr. Garza.
Mr. Garza continued to make public threats against the PayCoin Foundation, suddenly demanding transparency from all parties involved. His threats included legal action on behalf of the original investors in PayCoin.
Mr. Garza demanding transparency
It remains unseen as to who he will be representing in those legal actions since the Department of Justice has determined that several investors’ transactions took place off the books to avoid federal banking watch lists.
As the meltdown continued, Mr. Garza became increasingly agitated. Several members of the community formed a Google Hangout that would allow the various parties to come to the table and communicate. Mr. Garza stated in various threads on HashTalk that he and GAW would not be taking place because they still owned the rights to the Controllers and would use legal force to take them back.
8Z5j3L9
Mr. Garza states PayCoin Foundation Prime Controllers to be returned via legal force
Mr. Garza stated that things were “about to get really bad.” Many in the community wondered if these statements were made in regards to the state of the investment they had made, the current legal situation with various U.S. Organizations, or the PayCoin Foundation directly.
Screenshot 2015-04-09 15.04.27
While Mr. Garza warned that people do not know what is about to come next, the editorial team at Coin Fire has obtained documents from a recent subpoena to Twitter requesting information regarding all Twitter accounts used by Mr. Garza.
The subpoena requested that Twitter provide a full accounting of all Twitter accounts originating from the @btc.com domain. The subpoena further requested all logins from IP addresses associated with those accounts. The response from Twitter shows that Mr. Garza has controlled several Twitter accounts in addition to his own personal account, @gawceo. His login activity includes a Twitter account for Mr. Stuart Fraser.
Stuart Fraser Twitter Account Accessed by Mr. Garza
Many of the Twitter accounts have since been deactivated, but the records for those accounts that were created, used, and accessed remain on Twitter servers and are now in the possession of Federal investigators.
Stuart Fraser Twitter Account Accessed by Mr. Garza
This implosion comes at a critical time. Federal investigators for several U.S. organizations have begun finalizing data collection efforts and preparing to take action. While Mr. Fraser’s involvement has been confirmed with various organizations, it appears that Mr. Garza was using his name in an effort to shill his operations online.
Cantor Fitzgerald did not respond to Coin Fire requests for a comment since Mr. Fraser allowed his and the firm’s name to be used in emails to potential investors.
Yesterday afternoon, a lawsuit was filed against GAW Miners, LLC regarding an unpaid power bill for the Mississippi location. The lawsuit, filed by Balch & Bingham LLP on behalf of MISSISSIPPI POWER COMPANY, is also receiving evidence from a federal agent that will allow the company to show the corporate veil was pierced–making Mr. Garza personally liable for the claimed damages of over $300,000 USD. Coin Fire’s newly formed legal analysis team is currently reviewing the documents submitted to the courts and will have a full report shortly.

source:http://coinfire.io/2015/04/09/paycoin-and-josh-garza-crashes-down/

Sunday, 22 March 2015

cara membuat bootable windows 7


Untuk membuat bootable Flashdisk windows 7 yang perlu anda miliki adalah

1. Satu buah USB Drive atau Falshdisk dengan kafasitas memori minimum 4 GB
2. Aplikasi untuk membuat bootable Flash Disk Win7 silahkan DOWNLOAD Windows 7 USB/DVD Download tool

kedua poin diatas telah Anda persipkan untuk langkah awal segera format flashDisk anda dengan HPUSBDisk, kemudian instal Windows7 USB DVD Tool sampai selesai, Untuk lebih jelasnya saya telah persipkan gambar 1 untuk tampilan awal setelah anda jalankan Windows7 USB DVD Tool
Setelah tampilan seperti diatas klik tombol Browse kemudian cari file ISO windows 7 pada PC Anda lalu klik tombol Next
Pilih tombol USB device dan akan langsung terbaca secara otomatis (lihat gambar dibawah)
Yang harus anda lakukan sekarang adalah menekan tombol Begin Copying lalu tunggu hingga proses penyalinan file windows 7 selesai
Windows 7 sekarang dapat dipergunakan melalui USB Drive/FlashDisk
UPDATE!!!!!!!!!!!!!!!!!!!!!!!!!!!!!!!!!!!!!!!!!!!!!!!!!!!!!!!!!!!!!!!!!!!!!!!!!!!!!!!!
Apabila cara diatas masih kurang memuaskan Anda bisa menggunakan cara burning Iso Windows 7 Ke Usb dibawah ini hanya dengan beberapa langkah berikut ini:
1. Download Unetbootin
2. Setelah diformat masukkan USB drive/flashdisk
3. Jalankan Unetbootin portable lalu silahkan atur pengaturannya seperti berikut:
4.Tunggu beberapa saat hingga proses berhasil
5. USB drive siap dipakai
UPDATE!!!! Cara Instal Windows 7 Melalui FlashDisk
Sebenarnya untuk cara instalasi via FlashDisk itu hampir sama dengan menggunakan CD/DVD cuma yang membedakannya hanya dari Boot pertamanya saja, jika Anda mau instal OS dari FlashDisk perhatikan gambar dibawah ini untuk setting BIOS-nya. Pada First Boot Device menunjukan CD ROM (untuk instal windows melalui CD/DVD) jika ingin menginstal windows 7 ke Flashdisk cukup ganti First Boot Device ke nama FlashDisk Anda.
UPDATE..16 April 2012
Cara membuat Bootable Flash Disk Windows 7 dengan UltraISO
1. Download Dan Instal UltraISO Silent Installer
2. Setelah UltraISO terinstal dengan benar silahkan klik kanan pada file ISO windows 7 kemudian pilih “Open With UltraISO”
3. Masukkan flash drive (Bisa menggunakan 4GB namun 8GB akan lebih baik)
4. Pada kiri atas UltraISO, Anda akan melihat “Bootable” – klik dan pilih “Write Disk Image”
5. Dalam “Disk Drive” Temukan nama flash disk Anda
6. Setelah Anda yakin itu adalah Flash Drive Anda, klik “Write”.
(Ini akan memakan waktu sekitar 5-10 menit tergantung kecepatan drive Anda)
semoga bermanfaat

MEMBUAT WIN XP BOOTABLE DENGAN FORMAT FAT 16

MEMBUAT WIN XP BOOTABLE DENGAN FORMAT FAT 16


Install ulang Windows XP pada netbook memang gampang-gampang susah. Karena tidak adanya CD/DVD drive mau tidak mau harus dicari cara alternatifnya. Selain dengan menggunakan CD/DVD eksternal, ternyata instal ulang Windows XP juga dapat dilakukan dengan menggunakan USB Flashdisk.

Ada beberapa metode untuk membuat USB flasdisk menjadi bootable, diantaranya menggunakan tool PeToUSB_3.0.0.7 dan USB prep8 yang menurut pemula sangat rumit digunakan dan rawan terjadi kesalahan. Selain itu ternyata kita dapat menggunakan sebuah aplikasi yang sangat mudah digunkan karena pemakaiannya menggunakan format GUI (bukan text mode seperti PeToUSb dan USB prep8). Aplikasi tersebut bernama WinSetupFromUSB.

Link Download WinSetupFromUSB via Mediafire

Untuk memulai pembuatan bootable USB Flashdisk, yang perlu sobat siapkan adalah:
-Komputer sehat yang mempunyai CD/DVD untuk membuat bootable USB Flashdisk
- USB Flashdisk minimal berukuran 1GB
- CD Windows XP
- Keberanian dan sedikit kesabaran
  clip_image001
Dan, berikut ini langkah-langkah yang perlu Anda lakukan:
1. Download dan install WinSetupFromUSB.

2. Masukkan CD Windows XP ke dalam CD/DVD pada komputer sehat. Dan copykan isinya ke salah satu folder pada harddisk.
clip_image003

3. Jalankan program WinSetupFromUSB. Jangan lupa untuk menancapkan Flashdisk ke dalam slot USB. Sehingga akan tampak dalam USB Disk Selection seperti ini:
clip_image004

4. Format Flashdisk USB Anda dengan mengklik RMPrepUSB.
image

5. Sekedar saran, Flashdisk USB yang berukuran hingga 2GB sebaiknya diformat dalam bentuk FAT16. Sementara untuk flashdisk 4GB ke atas harus diformat dalam bentuk FAT32. Kali ini saya akan memformat flashdisk Kingston Data Traveler milik saya dengan FAT16 dengan mengklik RMPrepUSB dalam menu utama WinSetupFromUSB.
image
Dalam halaman utama RMPrepUSB Anda akan temukan flashdisk Anda di bawah kolom Drive. Selanjutnya pilih Fat16, Boot As HDD, dan XP Bootable (NTLDR). Pastikan juga Anda tidak memilih checkboks Choose Folder di bagian bawah. Klik Prepare Drive untuk memulai Format.

6. Saat muncul konfirmasi dari RMPrepUSB, Klik OK.
clip_image012

7. Kemudian muncul peringatan bahwa data di dalam flash disk akan dihapus semua. Langsung klik OK.
clip_image013

8. Muncul tampilan DOS sebagai berikut:
clip_image015

9. Selanjutnya klik Exit untuk keluar dari RMPREPUSB.

10. Pilih Folder Source Anda. Klik tombol Browse di baris Windows 2000/XP/2003. Temukan folder master Windows XP yang sebelumnya telah kita buat. Dalam hal ini saya menggunakan H:\.
clip_image016
clip_image017
Jangan lupa klik OK dan folder D:\WinXPHome akan tampak di kolom Windows 2000/XP/2003 Source .

11. Copy semua file dalam folder master Windows XP. Untuk memulai langkah ini, klik tombol GO dalam jendela utama program WinSetupFromUSB. Tunggu beberapa saat hingga proses penyalinan dokumen selesai. Penyalinan dokumen memakan waktu kurang lebih 15 menit.clip_image018

12. Jika muncul License Agreement, silakan baca dan klik Agree. Selanjutnya, ketika Anda melihat konfirmasi seperti ini, maka rangkaian proses ini telah selesai.
clip_image019

Klik OK dan tutup program WinSetupFromUSB dengan memilih tombol EXIT.

Selanjutnya sobat tinggal melakukan booting lewat USB dan melakukan instalasi biasa.

Bagaimana cara mengganti Port SSH

Bagaimana cara mengganti Port SSH?

Bagaimana cara mengganti Port SSH?Bagaimana cara mengganti Port SSH? Secure Shell atau SSH adalah Protokol jaringan yang memungkinkan pertukaran data melalui saluran aman antara dua perangkat jaringan. Terutama banyak digunakan pada sistem berbasis Linux dan Unix untuk mengakses akun shell, SSH dirancang sebagai pengganti Telnet dan shell remote tak aman lainnya, yang mengirim informasi, terutama kata sandi, dalam bentuk teks sederhana yang membuatnya mudah untuk dicegat. Enkripsi yang digunakan oleh SSH menyediakan kerahasiaan dan integritas data melalui jaringan yang tidak aman seperti Internet.
SSH menggunakan kriptografi kunci publik untuk mengotentikasi komputer remote dan biarkan komputer remote untuk mengotentikasi pengguna, jika perlu. SSH biasanya digunakan untuk login ke mesin remote dan mengeksekusi berbagai perintah, tetapi juga mendukung tunneling, forwarding TCP port dan X11 connections; itu dapat mentransfer file menggunakan terkait SFTP atau SCP protocols. SSH menggunakan klien-server model. Yang standar TCP port 22 telah ditetapkan untuk menghubungi server SSH. Sebuah klien program SSH ini biasanya digunakan untuk membangun koneksi ke SSH daemon untuk dapat diremote. Keduanya biasanya terdapat pada sistem operasi modern, termasuk Mac OS X, Linux, FreeBSD, Solaris dan OpenVMS. Tersedia versi berpemilik, freeware dan open source untuk berbagai tingkat kerumitan dan kelengkapan.

Cara Mengganti Port SSH!

Pertama anda harus membuka Putty terlebih dahulu untuk masuk root server anda melalui SSH. Silahkan anda masukkan User dan Password root anda. Jika sudah langkah pertama yang harus anda lakukan adalah menjalan perintah dibawah ini:
nano /etc/ssh/sshd_config atau vi /etc/ssh/sshd_config
Anda boleh menggunakan Nano atau Vi untuk melakukan editor (sesuai dengan keinginan anda). Setelah itu nantinya anda akan melihat Source yang kurang lebih seperti ini:
root@eagle [~]# nano /etc/ssh/sshd_config
GNU nano 1.3.12          File: /etc/ssh/sshd_config
#       $OpenBSD: sshd_config,v 1.73 2005/12/06 22:38:28 reyk Exp $
# This is the sshd server system-wide configuration file.  See
# sshd_config(5) for more information.
# This sshd was compiled with PATH=/usr/local/bin:/bin:/usr/bin
# The strategy used for options in the default sshd_config shipped with
# OpenSSH is to specify options with their default value where
# possible, but leave them commented.  Uncommented options change a
# default value.
#Port 22
#Protocol 2,1
Protocol 2
#AddressFamily any
#ListenAddress 0.0.0.0
#ListenAddress ::
[ Read 118 lines ]
^G Get Help  ^O WriteOut  ^R Read File ^Y Prev Page ^K Cut Text  ^C Cur Pos
^X Exit      ^J Justify   ^W Where Is  ^V Next Page ^U UnCut Text^T To Spell
Contoh di atas sudah jelas saya menggunakan Command Nano! Jika anda tidak bisa menggunakan command nano anda bisa menginstall command tersebut terlebih dahulu dengan menjalankan command:
yum install nano
Jika sudah, kita kembali ke source hasil dari /etc/ssh/sshd_config. Yang perlu anda lakukan untuk merubah Port tersebut adalah pada bagian:
#Port 22
Anda cukup mengganti 22 dengan Port yang ingin anda tuju. Tetapi anda sebelumnya harus menghapus simbol Pagar yang ada pada line tersebut. Jika sudah simpan hasil editan anda dengan cara menekan CTRL + X.
Kemudian Restart SSH:
/etc/init.d/sshd restart
Tunggu hingga proses restart selesai. Kemudian keluar dari Putty dan coba masuk melalui putty dengan Port yang sudah anda ganti sebelumnya

Membuat Bootable Windows XP dari CD melalui FlashDisk


Membuat Bootable Windows XP dari CD melalui FlashDisk
  1. Siapkan 1 buah USB drive dengan kafasitas 1 – 2 GB
  2. Aplikasi untuk format FlashDisk dan silakan Download DISINI.
  3. Program untuk membuat autorun windows XP/Vista agar bisa boot dengan flashdisk yakni WinToFlash Download
  4. Jika ketiganya telah anda persiapkan, untuk langkah pertama silahkan anda format USB Drive / Flashdisk anda dengan aplikasi pada langkah No.2 setelah selesai pekerjaannya sekarang instal aplikasi WinToFlash sampai selesai.
  5. Untuk windows file Path Anda harus mengklik tombol pilih lalu mencari file windows XP yang berada di CD ROM seperti screenshot ini.
  6. Kemudian untuk pilihan USB Drive silahkan anda klik tombol pilih lalu cari Drive flasdisk berada.
  7. Setelah keduanya anda pilih silahkan lanjutkan dengan menekan tombol berikutnyaBeri ceklis pada “Aku diterima syarat-syarat …..” lalu klik tombol Lanjutkan dan tunggu hingga selesai proses boot-nya. Setelah berhasil membuat Windows XP USB sekarang sudah siap digunakan untuk install windows lewat USB/FlashDisk.UPDATE!!!! Cara Instal Windows XP/Vista/7 Melalui FlashDisk
    Sebenarnya untuk cara instalasi via FlashDisk itu hampir sama dengan menggunakan CD/DVD cuma yang membedakannya hanya dari Boot pertamanya saja, jika Anda mau instal OS dari FlashDisk perhatikan gambar dibawah ini untuk setting BIOS-nya. Pada First Boot Device menunjukan CD ROM (untuk instal windows melalui CD/DVD) jika ingin menginstal windows 7/XP/Vista ke Flashdisk cukup ganti First Boot Device ke nama FlashDisk Anda.
     cara menggunakan WIN TO FLASH
    Sebelumnya download dulu WIN To FLASH DISINI
    WinToFlash adalah sebuah perangkat lunak untuk transfer Windows XP, Windows 2003, Windows Vista, Windows 2008, Windows 7 setup Anda dari CD atau DVD ke USB dalam beberapa klik mouse. Kemudian Anda dapat menginstal Windows Anda dari USB pen, HDD, USB flash drive atau FlashDIsk dll untuk komputer atau netbook Anda.
    WinToFlash terbaru 2011 dapat mentransfer live CD atau DVD ke kartu USB, misalnya, BartPE. Setelah semuanya selesai dipergunakan Anda dapat menghapus media Anda dan mem-format USB dengan Windows untuk penggunaan sehari-hari. WinToFlash mendukung untuk semua windows seperti Windows XP/2003/Vista/2008/7
    Namun ada beberapa pertanyaan yang masuk melalui kotak komentar yang meminta lisensi untuk Novicorp WinToFlash padahal telah disertakan dalam setiap paket downloadnya.
    1. Setelah anda download kemudian ektrak dengan WinRAR atau 7-Zip
    2. Jalankan file WinToFlash dan akan terbuka window baru
    3. Klik tombol Next
    4. beri ceklis pada IAccept EULA kemudian  klik Next lagi
    5. Tekan tombol Activate lisence now
    6. Pilih tombol Select selanjutnya cari lisensi wintoflash yg berada di folder License
    7. Klik tombol Open
    8.Jika telah menemukan wintoflash key tekan tombol Open
    9 . klik tombol Next
    10. Next lagi
    11. Selesai dan untuk melanjutkan membuat bootable USB Driver silahkan klik tombol next. pada screenshot dibawah ini setiap anda akan menggunakan aplikasi wintoflash ini anda cukup menekan tombol Ceklis Hijau.

Recent